# SmartThings API
TIP
SmartThings have a weird functionality and if you don't use the SmartThings application from your phone for longer times (about a month) it will deactivate your device and you will not be able to control it through SmartThings until you pair the device again in the application.
In my opinion, these are anti-competitive methods to force you to use their application.
WARNING
Features using SmartThings API are not local and it will require the server to have access to internet. Requests are sent to SmartThings API, not the TV itself.
We are starting to implement new features from SmartThings API and migrate some functionalities to their API instead of using hacks.
What can be done throught SmartThings API:
Select a specific input like HDMI1: The local API only supports to send KEYs that are found on a phisical remote and because of that it was not possible to select a specific input. With SmartThings we can do that 😃
Set a specific volume: Now you can set a volume for your TV. Until now you were able to use only VOLUP and VOLDOWN.
Change the picture mode: Option to change the picture mode.
Change channel: This is possible even without SmartThings API but it was using some hacks. If you setup the SmartThings API then it will be used, if not, it will fallback on the old method of changing channel.
But before starting to use these awesome features we will need to setup SmartThings API to work with our devices. There are a few steps but if you follow the guide it's not that hard!
In order to connect with SmartThings API we will need two keys, api_key which is unique for your account and it's the same for all devices and device_id which is specific to every device.
DANGER
Please make sure to never post the api_key and device_id public on the internet when you are looking for help or want to show an example of config. Having those informations anyone could control your device!
# Setting up the app
First step is to install the SmartThings application on your phone.
If you need help you can follow the steps from Samsung support page (opens new window)
Then you want to make sure you add your TV to SmartThings application and that you can control the TV. Make sure you can control the TV because if you didn't use the application for a long time, SmartThings will remove the device connection and you will have to remove the device add it again.
# Getting the api key
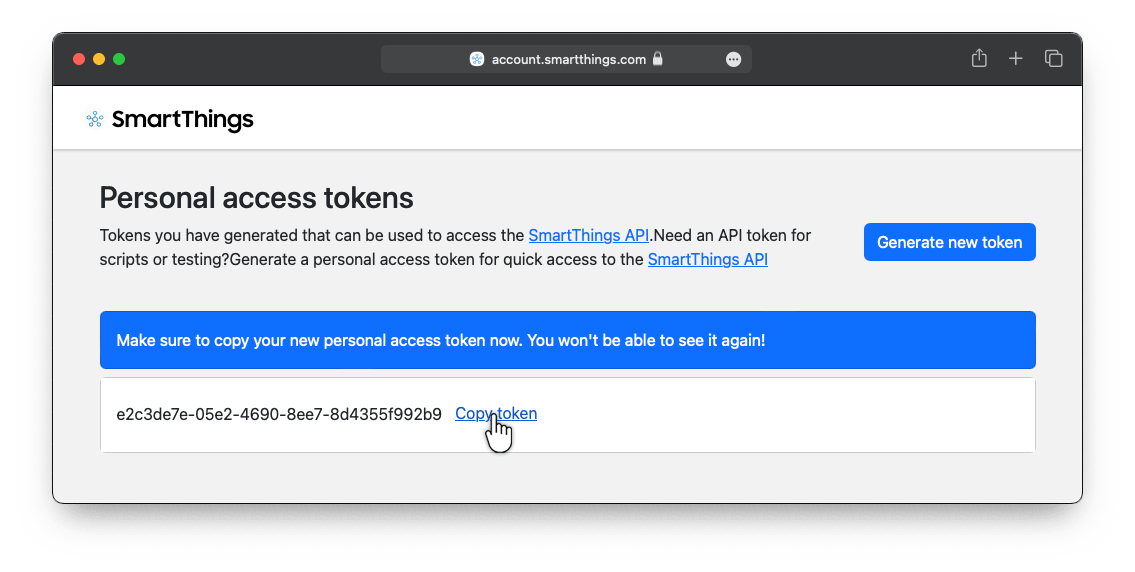
Go to https://account.smartthings.com/tokens (opens new window)
Login with the same credentials you used in the SmartThings application.
Click on Generate new token button:

On Token Name insert a name for your token so you will be able to identify it. For example Homebridge Samsung-Tizen.
On Authorized Scopes you can select all checkboxes. I suggest selecting everything from the list because I don't know what features will be included in a future version or what SmartThings API want to access when you use one of the current feature.
If you don't want to select everything from the Authorized Scopes the minimum you need is all from Devices, Installed Applications, Applications, Channels, Custom Capabilites and Device Profiles. But again, depending on the features you may get Unauthorized response from SmartThings API.
Click Generate token button on the lower part of the screen then copy the token key! Please make sure you copy it now because after refresh you will not be able to see the token key ever again and you will have to generate a new token.
# Getting the device id
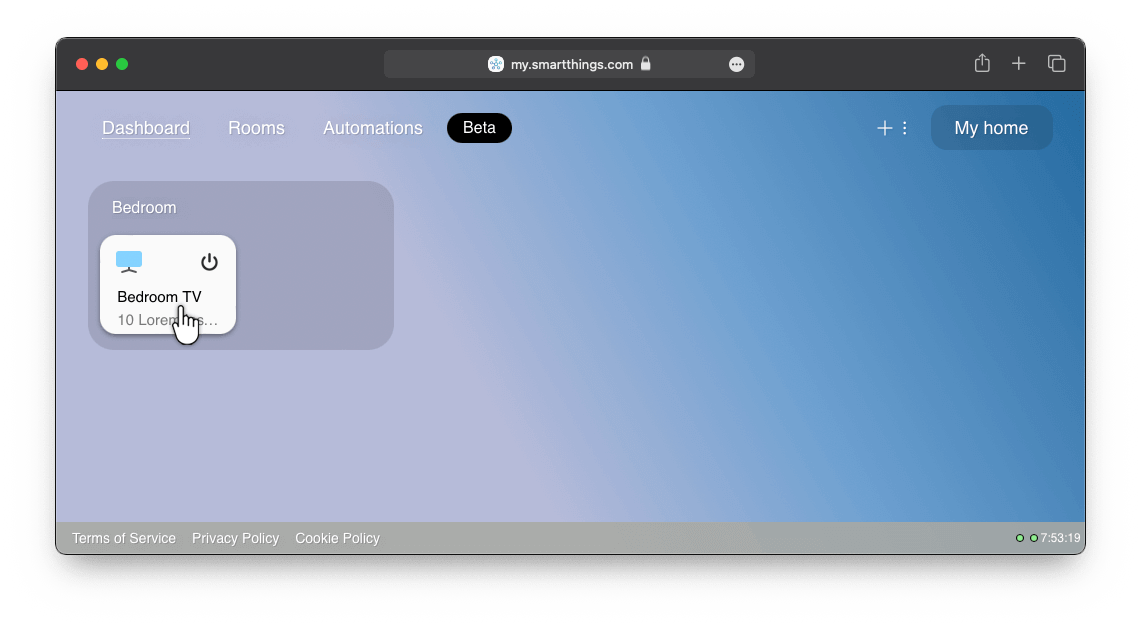
Go to https://account.smartthings.com/ (opens new window)
Login with the same credentials you used in the SmartThings application.
Now you should see the Dashboard with your rooms and devices. Click on the device you want to get the ID for.
After you click on the device a popup should open and on the left side you should have the device_id (5d9215vx-c421-4e12-a998-c4ec48754f08 from our example).
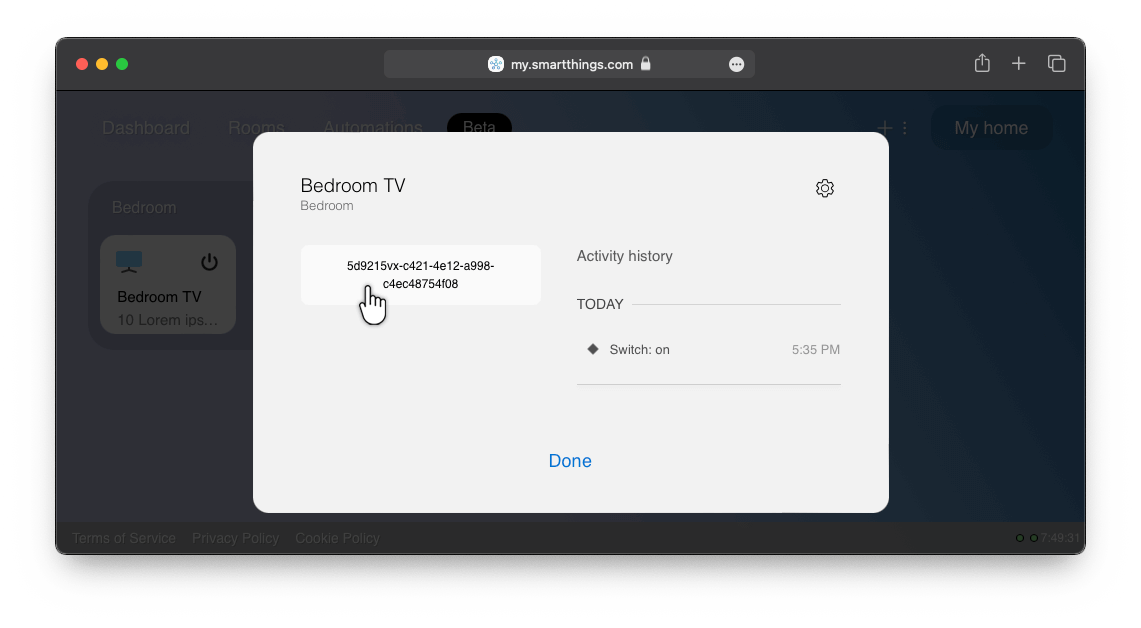
If you have multiple TVs click on each one to see the popup and copy the device_id for each one.
# Setting up the configuration
If you are using Config UI X you can do this from the settings of the plugin.
If you like to be the master of your config and edit it then here are some examples:
{
    "platform": "SamsungTizen",
    "devices": [
        {
            "name": "Bedroom TV",
            "ip": "10.20.30.40",
            "mac": "A0:B1:C2:D3:E4:F5",
            "api_key": "XXXXXXXX-XXXX-XXXX-XXXX-XXXXXXXXX",
            "device_id": "XXXXXXXX-XXXX-XXXX-XXXX-XXXXXXXXX"
        }
    ]
}
If you have multiple devices you can set the api_key as general and it will apply to all devices like this:
{
    "platform": "SamsungTizen",
    "api_key": "XXXXXXXX-XXXX-XXXX-XXXX-XXXXXXXXX",
    "devices": [
        {
            "name": "Bedroom TV",
            "ip": "10.20.30.40",
            "mac": "A0:B1:C2:D3:E4:F5",
            "device_id": "XXXXXXXX-XXXX-XXXX-XXXX-XXXXXXXXX"
        },
        {
            "name": "Living Room TV",
            "ip": "10.20.30.40",
            "mac": "A0:B1:C2:D3:E4:F5",
            "device_id": "XXXXXXXX-XXXX-XXXX-XXXX-XXXXXXXXX"
        }
    ]
}
Now all you have to do is to restart the Homebridge server and you are set!
Ok Ok, the Smart Things API is set but how do I use all the new cool stuff????