SmartThings integration
SmartThings is optional. Without it, the plugin still turns the TV on and off, changes the volume and mute, launches apps, sends remote keys, and controls Art Mode on a Frame. All of that runs on your local network.
Connect SmartThings when you want the features that Samsung only offers through its cloud API: selecting a source such as HDMI, setting a picture or sound mode, changing the channel through the API, and turning a Frame fully off. They are described on the SmartThings features page.
WARNING
SmartThings is not local. Homebridge sends those requests to the SmartThings API, so the server needs internet access, and the features stop working while SmartThings is down.
Personal access tokens (api_key in version 5) are no longer accepted. You create your own SmartThings app once, enter its client ID and client secret in the plugin settings, and authorize it. After that the plugin refreshes the access token on its own.
The setup has three parts:
- Create a SmartThings app with the SmartThings CLI
- Connect it from Homebridge UI
- Pick the TV on each device
DANGER
Do not post clientSecret, tokens or an authorization code in a public issue or screenshot. Anyone with the client ID and secret can request tokens for your app.
Before you start
- The TV is added in the SmartThings app on your phone, and you can control it from there.
- You have a computer with a browser to run the SmartThings CLI. It does not have to be the Homebridge server. The CLI opens a browser window to sign in, so a headless server such as a Raspberry Pi without a desktop is not a good fit.
TIP
If the SmartThings app on your phone is left unused for a long time, SmartThings can drop the TV. Control stops until you add the TV in the app again.
Create the SmartThings app
Install the SmartThings CLI
The SmartThings CLI is the official command line tool from Samsung.
On macOS, with Homebrew:
brew install smartthingscommunity/smartthings/smartthingsOn Windows, download and run smartthings.msi from the latest release.
On Linux or any system with Node.js:
npm install --global @smartthings/cliCreate the app
Run:
smartthings apps:createThe first time, the CLI opens a browser window. Sign in with your Samsung account and allow the CLI to access it. Then go back to the terminal and answer the prompts:
| Prompt | Answer |
|---|---|
| App Type | OAuth-In App |
| Display Name | Homebridge Samsung-Tizen (any name is fine) |
| Description | Monitor and control Samsung Smart TVs via SmartThings API |
| Icon Image URL | Leave empty |
| Target URL | https://tavicu.github.io/homebridge-samsung-tizen/token.html |
| Scopes | Only r:devices:* and x:devices:* |
| Redirect URI | https://tavicu.github.io/homebridge-samsung-tizen/token.html |
Scopes
Select only r:devices:* and x:devices:*. The second one starts with x:, not w:. The plugin only reads the TV status and sends commands. It does not need any other access to your account.
When you have added the Redirect URI, choose Finish editing Redirect URIs, then Finish and create OAuth-In SmartApp.
The CLI prints the OAuth Client ID and OAuth Client Secret. Copy both and keep them somewhere safe. You need them in the next step.
Lost the client secret?
Run smartthings apps:oauth:generate and choose the app. SmartThings creates a new client ID and secret. Run the wizard in the plugin settings again with the new values.
Connect from Homebridge UI
Open the plugin settings in Homebridge UI. The SmartThings card is at the top. Choose Connect to SmartThings.
The wizard has three steps.
1. Credentials
Paste the Client ID and Client Secret and choose Continue. Both are saved in the plugin config, and the wizard builds the authorization URL for your app.
Advanced settings lets you change the redirect URL. Leave it empty unless you created the app with a different Redirect URI. It must be exactly the same as the one in your app.
2. Authorization
Open the Authorization URL in a browser. You can click it, or use Copy and paste it in a new tab.
Sign in with your Samsung account and allow access. SmartThings sends you to the authorization page of this documentation, which shows a code. Copy it.
Go back to the wizard, paste the code in Authorization Code and choose Authorize.
TIP
The code can be used only once, and it expires after a short time. If the wizard rejects it, start again from the authorization URL and use a fresh code.
3. Result
Connection successful means the plugin has a token, and the card now shows Connected.
Authorization failed means the code was wrong, expired or already used, or the credentials do not match the app. The error from SmartThings is shown under the message. Choose Try again.
Restart Homebridge after the first connection, so the plugin starts using SmartThings.
Pick the TV
Each TV needs its SmartThings device ID (deviceId). Without it, SmartThings features are not used for that TV, even if the account is connected.
Edit the TV in the plugin settings. SmartThings Device ID is a list of the TVs and monitors in your SmartThings account. Pick the TV and choose Update Device.
If the TV is not in the list, choose Other and paste the ID. You can find it in two ways:
- With the CLI, run
smartthings devices. The ID is in the Device Id column. - In a browser, open my.smartthings.com, sign in, and click the TV. The ID is shown in the window that opens.
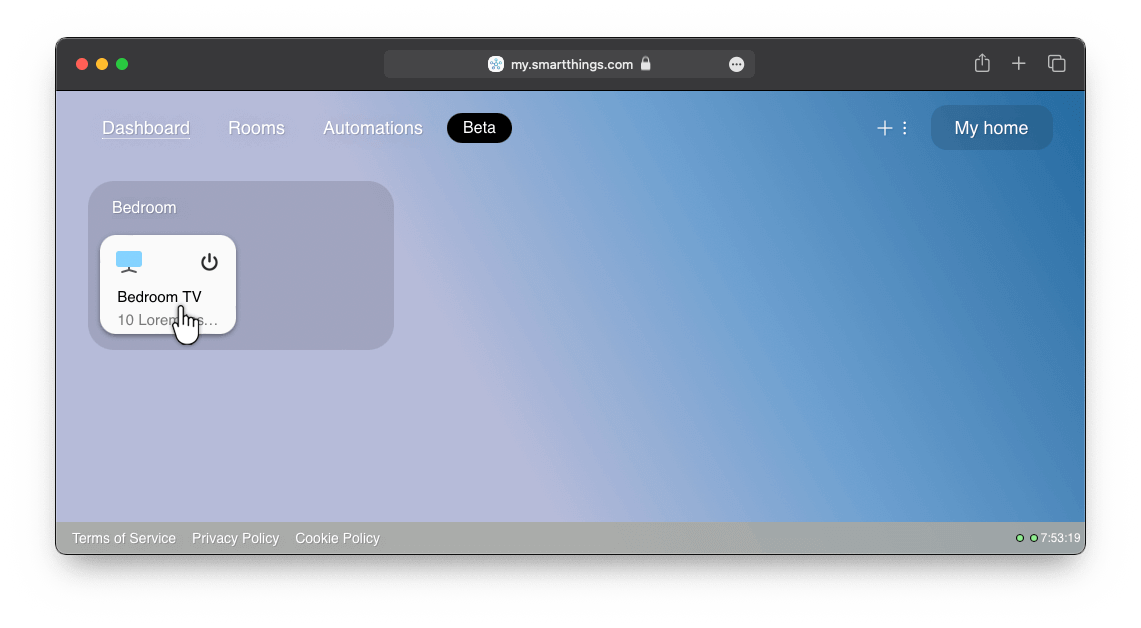
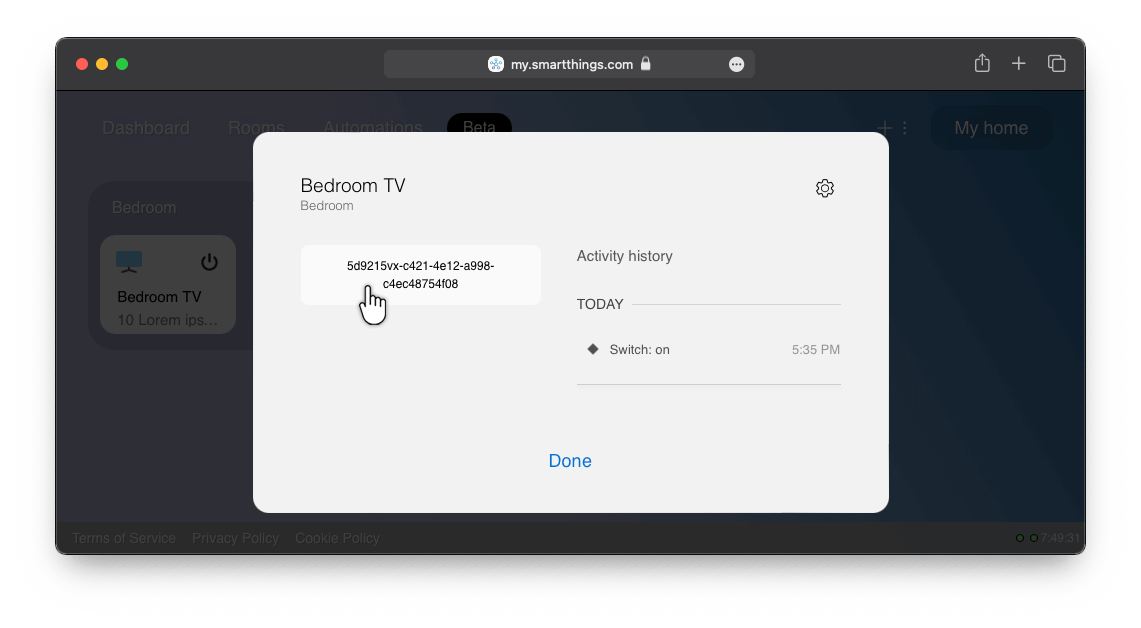
Once the TV has a device ID, the settings screen also loads its input sources, picture modes and sound modes when you add an input or a switch from that TV. See SmartThings features.
Connection status
The SmartThings card shows the state of the authorization.
| Status | Meaning | Action |
|---|---|---|
| Connected | The plugin has a valid token and refreshes it on its own. | Edit Credentials runs the wizard again. |
| Expired | The token is no longer valid, or SmartThings rejected the authorization. | Re-authorize SmartThings runs the wizard again. |
| Not connected | No authorization is stored. | Connect to SmartThings starts the wizard. |
The access token is refreshed automatically before it expires. If the internet connection or the SmartThings servers are down, the plugin tries again after 1, 5, 15 and 30 minutes, then every hour, until it works. You do not have to do anything.
If SmartThings rejects the authorization itself, the plugin stops trying, writes it in the log, and the card shows Expired. Run the wizard again. The plugin picks up the new authorization without a Homebridge restart.
TIP
If Homebridge was stopped for a while, the card can show Expired until the plugin starts again and refreshes the token.
Disconnect removes the stored tokens. The client ID and secret stay in the config, so you can connect again later without creating a new app. Restart Homebridge after you disconnect.
Manual configuration
The settings screen writes these keys for you. clientId and clientSecret are set on the platform. deviceId is set on each TV.
{
  "platform": "SamsungTizen",
  "clientId": "xxxxxxxx-xxxx-xxxx-xxxx-xxxxxxxxxxxx",
  "clientSecret": "xxxxxxxx-xxxx-xxxx-xxxx-xxxxxxxxxxxx",
  "devices": [
    {
      "name": "Bedroom TV",
      "ip": "10.20.30.40",
      "mac": "A0:B1:C2:D3:E4:F5",
      "deviceId": "xxxxxxxx-xxxx-xxxx-xxxx-xxxxxxxxxxxx"
    }
  ]
}
Adding only the client ID and secret to config.json does not connect the account. The authorization code still has to be exchanged once from the wizard.
Troubleshooting
The wizard says Authorization failed
The code was wrong, expired, or already used. Choose Try again and use a fresh code.
If it keeps failing, check the app you created:
- App Type is
OAuth-In App. - Redirect URI is exactly
https://tavicu.github.io/homebridge-samsung-tizen/token.html. If you used another one, enter it under Advanced settings in the first step of the wizard. - The client ID and secret belong to that app. If you generated new ones, use the new pair.
SmartThings returns 401
The token is no longer accepted. The plugin refreshes it and repeats the request once. If the log still shows [SmartThings] Authorization was rejected, run the wizard again.
SmartThings returns 403
The app is missing r:devices:* or x:devices:*, or the deviceId on the TV is not a device on the account you authorized. Edit the TV and pick it again from the list.
The TV is not in the device list
The list only shows devices that SmartThings reports as a TV or a monitor. Check that the TV is in the SmartThings app and that you authorized the same Samsung account. You can always choose Other and paste the ID.
The log says No access token found
[SmartThings] No access token found. Follow the authorization flow... means the client ID and secret are in the config, but the wizard was not finished. Run it from the SmartThings card.